Wednesday, March 24, 2010

Tools for your Dorm Room

When you came to college, you probably didn't have much in the way of possessions that would help you get by. Towels, a box fan, maybe some underbed boxes, laundry accessories, etc. Maybe someone was really thinking ahead and gave you some eating implement, like plates, silverware, or bowls. Little did they realize that you'd have to walk down the hall to wash these things each time you used them, and you're in college, so you can't be bothered to do that.

So I've compiled a list of items you should have in your dorm room, especially if you don't have a meal plan, to ensure you don't starve.

  1. Paper plates and bowls, and plastic flatware. Yes, being wasteful is a terrible thing, I know. And if you can stand washing dishes in a bathroom sink, then go for it. For the rest of us, disposable plates, bowls, and flatware is the easiest way to go - just avoid foam at all costs. Make sure you get plates and bowls that have a thin plastic coating on the eating surface, because the super cheap ones don't and will leak through. Good paper bowls, like Dixie paper bowls, will stand up to cereal with milk, and not leak. Likewise, paper plates like the coated ones I find at Walmart, will stand up to microwaving wet substances and eating very hot foots from. Disposable flatware type is less important... get whatever's cheap!
  2. Microwave & Mini-fridge. Know that each time you make popcorn in your microwave, it will never pop it quite as well as the last time. Get one that's reasonably priced, but don't bother with the very cheapest. They will only last 6 months at most, and won't cook well enough to be worth it anyway. Also, mini fridges need a bit of maintenance to ensure their ice boxes don't completely clog up with ice layers.
  3. Pyrex containers with lids. You don't need a lot of them. I purchased this set a while back and, probably partially because I have no dishwasher to put the lids in, they have been one of the best investments I've made. You can store a lot of stuff in them, and they hold up really well. Microwave safe, too.
  4. Microwaveable baking dish with glass lid. The glass lid is the most important part - instead of having to stretch saran wrap over this thing to steam veggies, you can just use the lid and zap! I got one of these from Walmart a while back, and it too has stood up to a lot of abuse. These things are great because you can go to the store, pick out any fresh veggie you like, stick it in this dish with a splash of water and the lid, and zap it for 3-4 minutes, and you have steamed fresh veggies! In one dish, no boiling required!
  5. An electric multi cooker pot similar to this. This this has allowed me to cook a HUGE batch of pasta in one go, and continues to impress me with its versatility and nonstick properties. It might be of questionable legality to have in your dorm room, but I think it's worth the trouble - it's so versatile and easy to deal with, you'll be happy you got one.

Well that's it for now. The next recipe will probably be something like my ghetto chicken parmesan... stay tuned!
Saturday, March 28, 2009

Tuna Sandwiches... the Girl Technologist way

So, as a poor graduate student, I will admit that the food I put in my mouth isn't always healthy. I try to eat healthy as much as possible... as evidenced by the assortment of fruits and vegetables in my fridge. Side note - blackberries are abundant at Walmart! Rejoice!

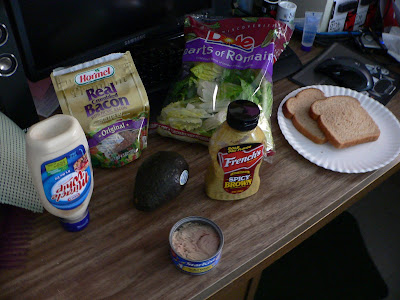
Anyway, so I love tuna sandwiches. So much so that I actually have a favorite brand of canned tuna... cue famous Jessica Simpson quote, if you're curious. I've found that tuna is a great way to add protein to a dorm diet that is severely lacking it, since canned tuna is already cooked, and can pretty much be added to anything. I have a small bottle of Miracle Whip in the fridge reserved solely for my tuna. Well, I had an avocado I was going to make into guacamole (see my original recipe... I found a great new shortcut for that recipe, thanks to Walmart being intuitive and selling prepackaged pico de gallo mixes), and I thought to myself, "What would be a great substitute for mayo.... AVOCADO!" So I got an idea. And I took pictures. Here are the ingredients:

1 small can of tuna, drained (they now sell small cans with pull tops, that are good for a single serving... GREAT for the dorm)
Miracle Whip
Brown mustard (optional)
Avocado
Bacon bits (optional)
Lettuce (optional)
Bread (definitely not optional)


Directions:

1. Empty the tuna and bacon bits into a bowl, and mix with just a bit of mayo - enough to get the mixture wet, but don't put a lot. We want the main wet ingredient to be the avocado... it's way healthier.

2. In another bowl, mash up the avocado as finely as needed. Here I'm using only 1/4th of the avocado, but use more if you prefer your sandwich to be more moist.

3. Combine mashed avocado and tuna mixture - if you need a little more moisture, add a dab more mayo, or avocado if you're feeling up to that.


4. Once well mixed, place mixture on the bread. Here you can add lettuce, tomato, pickles, whatever you want. I had lettuce on hand, but if I had had some slices of tomato, I would have put that on too.


5. Add the mustard, if you want any, to the other piece of bread. A little brown mustard goes a long way!

6. ENJOY!

Wednesday, November 19, 2008

Homemade Guacamole

If you're pressed for space like me, you'd probably rather make a large mess making some sort of dish and save it for several meals, rather than making a new mess for every meal! Here is a recipe that, while a bit messy, requires no cooking at all and stores well! Avocados may be expensive at the store ($1.50 each?) but with 4 avocados you can make enough dip for at least 4 servings, and since you're only using healthy food, it's worth the extra money. There's a lot of information out there on the amazingness that is avocados, so if you're interested, you should check it out.

If you want, you could add cream cheese or sour cream to this like my mom does, but I'm a purist.

Ingredients:

3-4 ripe avocados (they can be a bit expensive but are well worth the price)
1 large red tomato, seeded and diced
1/2 or 1 whole onion, diced
2 cloves garlic
lemon juice
salt & pepper


Directions:


1. Chop up the tomato, onion, and garlic.

2. Cube the avocado flesh and put it into the mixture, adding lemon juice on top of each avocado.
unsure of how to deal with an avocado? here's a good guide.

3. Mash! A fork or large spoon works well, or use a potato masher if you have one. You can make it as chunky or as smooth as you like - I like it mostly smooth with some chunks.

4. Salt and pepper to taste - the salt is key here. It really brings out the flavor of the avocado.

5. Enjoy with tortilla chips or on tortilla shells!

Thursday, August 7, 2008

Easy & Cheap Microwave Popcorn

So I know, what's easier than buying prepackaged microwave popcorn, unwrapping the plastic and nuking it for 3.5 minutes? Well, although that's really easy, if you have an underpowered dorm microwave, you might have some problems. For example, you might end up with a bag of half-burned popcorn and a lot of unpopped kernels in the bottom. Or, if you're like me, you end up with way too much popcorn for just one person! The amount of fat and other crap in a bag of buttered microwave popcorn is not good, especially when you're eating ramen all the time - cutting back where you can is good.

This recipe enables you to pop an individual serving of popcorn, in only about 2 minutes, with few to no unpopped kernels. It also allows you to butter and season it anyway you like.

You need:
Popping corn that comes in a jar
Paper lunch bags
Tape
Spray butter if you're going for minimal butter, or melt your own regular butter
Any salt/seasonings you like.

Directions:
1. Open the bag up and unfold it so there's as much room as possible inside.

2. Pour approximately 3 tablespoons worth of corn into the bag

3. Fold the top of the bag over once, about half an inch down, then fold over again and tape closed. (Make sure the bag still has that unfolded look)

4. Place the bag on its biggest side (area-wise) in the microwave

5. Microwave on high for 1.5-2.5 minutes, and wait till the popping slows to about 4-5 sec between each pop.

6. Tear off the top of the bag, spray/pour your butter and seasonings in, give it a few tosses, and you're good to go!

Thursday, July 31, 2008

Microwave Chocolate Cake

So, this is my recipe for a single serving of chocolate cake, prepared in the microwave. If you've had those Betty Crocker microwaveable cakes, you'll know what I'm talking about. But this recipe is way better!

The original recipe calls for a mug, but I've found making it in a small microwaveable bowl (like a ceramic cereal bowl) works best. The idea is to make them as a gift by combining the dry ingredients in baggies, and finding a cute microwaveable mug to put the baggies in and give as gifts. So that's why the recipe calls for a LOT of the dry ingredients... I went out and bought the dry ingredients, mixed them, and have been saving them in a ziplock bag, scooping out as I go.

Ingredients:

Dry
1 box cake mix (any flavor you like - try Dark Chocolate)
1 small box instant pudding mix (any flavor you like - try Devils Food)
These will provide about 7-8 servings of cake.

Wet
1 egg white
1 tbsp water
1 tbsp oil

Icing - optional
1/4th of a Hershey's bar (3 of those tiny little rectangles)

Directions:
1. Premix the dry ingredients first... Pour them into a gallon-sized ziploc bag and toss for a good 3-5 minutes. You'll know when it's well mixed because the jello mix particles are more granular than the cake mix. Make sure it's evenly mixed.

2. Combine the wet ingredients in a separate container (not the one you'll be zapping). I've used disposable paper bowls, and plastic cups. Mix well! This is very crucial!

3. Combine 1/2 cup of the dry mixture to the wet mixture (in the secondary container) and mix till there are very few if any lumps and it's an even consistency.

4. Spray the inside of your bowl with cooking spray and then dump your cake batter into the bowl - mixing before dumping into the bowl helps reduce the mess because you won't have to scrub your ceramic bowl out as hard when you're done.

5. Microwave on high, uncovered, between 1 and 2 minutes, depending on how powerful your microwave is. Mine is an 800 watt dorm microwave and I end up cooking about 1:40-1:45.

6. As soon as the cooking has ended, add your pieces of Hershey bar to the top and let stand for another 1.5 minutes. This will allow the chocolate to melt, and your bowl to cool a bit.

7. Spread the chocolate around on top of the cake and enjoy warm straight out of the bowl!

Variations:
- Try adding different things on top of the cake or into the batter to marble the flavor in. I've tried peanut butter, Rollos, and marshmallows. All have been yummy!
- You can use whatever flavor cake and jello mix you want. If you want to go for a white or yellow cake, use white or yellow cake mix with vanilla instant pudding, or any combination of flavors you can imagine.

Introduction

Welcome to The Frugal Dorm Life!

My name is GT - a first year graduate student who has 4 full years of dorm life behind her and another 1.5 years to look forward to!

This blog will be mostly recipes and frugal strategies for living so that you as a college student can learn get better at stretching your dollar, no matter where that dollar's coming from. We all need to buy the fun stuff once in a while (I just splurged on a new computer because the one I had when I started college was dying), so I want to pass on some of the tricks I've used over the years to save up for the fun purchases! Feel free to post recommendations or requests, and email me anything cool and new you come across.